|
by Fiona Valentine  The Artist's Creative Process was a mystery to me when I first began painting. Once the pieces fell into place, I felt empowered to bring my ideas to life! In this blog post, I outline some important pieces to build a process you love that really works. Painting begins long before you pick up a brush. Taking time to cultivate inspiration, gather references and design a strong composition are essential and enjoyable parts of the process. I’m confident all of us have enough creativity and talent. What we need are good training, practice and a creative process we enjoy. So, let's dive in! Learning to develop a creative process that works for you helps you become confident in painting. The process doesn't need to be linear - you may start at different points and cycle back to others. Having a process helps you be thorough and know what needs to happen next. It leaves room for preparation, exploring & experimenting. Learning all of the aspects of the creative process makes better painting possible even for a painter with limited experience. There are so many ways to make art – focus on learning the skills YOU need to make art YOU like in a way that works for you. Here are four key aspects to consider in developing your unique creative process. If you are just beginning, or thinking about beginning, this will be really helpful to give you an idea of how it all fits together. Some of the concepts may be completely new to you! Don’t be overwhelmed – I can help with each step. Just enjoy the ride! Creative Process: Inspiration Capture that flash of an idea. A huge part of creative process is inspiration. Capture that flash of an idea. An idea is precious - don't lose it! Write it down, take a photo. Save it on your phone, in a journal or sketchbook. Include your feeling & mood.
Creative Process: References References help you move from imagination to canvas .The next step in the creative process is to move from imagination to canvas. For this, artists need references. Models, objects and photos help to achieve detail, realism and beauty. Lighting is key. Have fun collecting, arranging, experimenting and combining. This is a wonderful part of the process and deserves dedicated time. Here are some simple tips for taking your own reference photos.
This will guide and inform your photography choices. You may even need to come back to the scene at a different time of day, in different weather or just move your body to find a new angle. If you are recording the scene in paint, try to focus on recording accurate colour more than painting the whole scene. A photo will never record colour as accurately as your eye sees it. I have a blog post about understanding colour if you'd like to learn more. Setting up a scene, still life, floral arrangement or portrait model can take a lot of time. It’s also a lot of fun. Here are some tips for making it work.
Creative Process: Design Design for the wow factor Next comes design. Carefully plan for the “wow factor” that delivers your vision. What is the feeling you want to convey? Write it down. Don’t rush it! You might spend an hour really digging deep here. Describe mood & atmosphere. If you don't know what feeling you are after, you won't be as clear in supporting that with appropriate colours, values , texture and edges. It doesn't have to be complicated or "deep", just clear.
Envision the end product. Crop, simplify, explore with thumbnail sketches until a strong composition emerges. A thumb nail sketch is a small drawing no bigger than 10 centimetres. Big value shapes are key here rather than detail. Create colour maps –rough patches of colour to test the combinations you might use for this painting and search for colours and values that convey the mood. Consider size, texture, style, edges. Experiment and even research to gather the techniques you need to express your idea. Feeling a little overwhelmed? Are you thinking, “Fiona, I don’t even know what some of these words mean, let alone how to do all that!” don’t worry, I’ve got you covered! My simple courses help fast track your skills so you can confidently learn to paint. Creative Process: Painting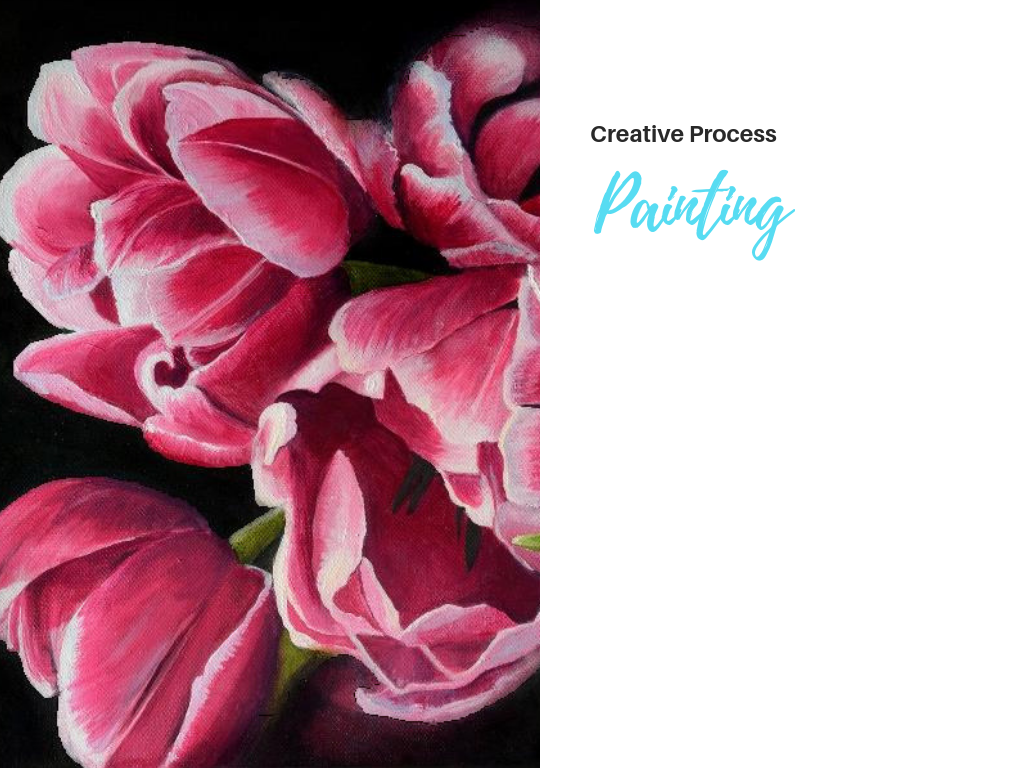 Plan your painting approach Painting is the core of the creative process. Plan the approach suitable to this painting's story & your current skills. Are you going to paint in a direct or layered approach? With a direct approach, you finish as you go and put down strokes that mostly stay as they are, working into wet paint. This is often called "Alla Prima" or "all at once" painting.
In a layered or indirect approach, you paint basic shapes and then build up a layers on top. finally adding detail.. There are many types of indirect painting from a basic block in with detail on top to a many layered, highly structured traditional Flemish or Venetian approach. Layers can be added wet or dry, depending on the techniques chosen and desired effect. I find it helpful to draw, mix colour & paint as separate tasks in the process – it’s OK for each of these stages to take plenty of time. Work in blocks of time that keep you fresh & take breaks as needed. I love timers for this. Enjoy the process & have courage in the middle miles! All paintings go through the "ugly" stage. Just keep going! Remember “paintings are never finished, they just stop in interesting places”. Be sure & photograph your work before varnishing or framing. Enjoy developing your unique creative process and getting the training you need to understand and be confident with each aspect. I hope this "helicopter view" of the process helps you slow down and enjoy learning each of the stages. It's easy to be in a rush to get paint on the canvas. Set yourself up for success by spending some time on each part of the process. If you enjoyed this article, be sure to grab my free pdf on creative process here via my freebie vault.
4 Comments
3/3/2022 07:12:13 pm
I very much appreciate it. Thank you for this excellent article. Keep posting! 24/11/2022 01:03:24 am
It can take far longer than you think! Some artists spend a whole day arranging a still life! Set out more items, flowers, props than you think you will need use. I’m so thankful for your helpful post! 29/6/2024 07:56:02 am
It can take far longer than you naturally suspect! A few craftsmen go through an entire day organizing a still life! Set out additional things, blossoms, props than you suspect you will require use. I'm so grateful for your supportive post! Leave a Reply. |
Hi, I'm Fiona. I'm an artist and art coach. I help aspiring artists learn to paint for fun AND for profit even if they've never sold any of their work before.
You have more than enough creativity and talent, what you need are skills - both for making art and the art of selling art. I can help! Archives
January 2022
Categories
All
|
 RSS Feed